![RIEGL_Logo_Schriftzug_rgb_R[1]-2](https://support.riegl.co.uk/hs-fs/hubfs/RIEGL_Logo_Schriftzug_rgb_R%5B1%5D-2.png?width=200&height=71&name=RIEGL_Logo_Schriftzug_rgb_R%5B1%5D-2.png)
By default, RIEGL VZ-series scanners record the global position of a survey using the WGS84 Coordinate Reference System (CRS). They can be configured with another CRS (e.g. OSGB36) by updating the database on the scanner.
RiSCAN PRO can also be configured with a CRS, either at the program level (so the CRS will be adopted by any new projects created), or at the project level. If the scanner has been configured with a CRS, this will be carried across to the project once imported into RiSCAN PRO.
Prerequisities
You will require:
- an Internet connection to access the online ESPG database.
- a grid shift file, provided by the Ordnance Survey and available from their website here, under the heading "NTv2 format files". Download the zip file, and find the file "OSTN15_NTv2_ETRStoOSGB.gsb" inside it. Be sure to choose the correct .gsb file, as there are two!
- a geoid model definition file, which can be downloaded here.
- RIEGL's GeoSysManager software, which is usually installed alongside RiSCAN PRO.
Configuration
The simplest way to configure a CRS is to set it up in RIEGL's GeoSysManager software. This can then be:
- set as the default CRS in RiSCAN PRO
- used in RiSCAN PRO on a per-project basis
- uploaded to a scanner
Set up a GeoSysManager database file
To demonstrate the process to set up a new projected CRS, we will use the UK Ordnance Survey system OSGB36.
Open GeoSysManager. Navigate to Database > New. The new database will contain a default set of parameters, including a few WGS84-based CRS, the WGS84 Geodetic Datum and Ellipsoid, some units of measure, and a few commonly used Prime Meridians.
GeoSysManager can import common CRSs from the EPSG online database. Navigate to Tools > Import from EPSG.
Type 27700 into the search box, and click "Search". Wait for the result to appear, and then click on it and click "Import". (Note - you can view the information held in the EPSG database for 27700 here.) After a short delay, the message "Import successfully finished" is displayed. Click OK to close the message, and then close the "Import from EPSG online database" dialog.
You will notice a few new records in the database:
Coordinate Reference Systems:
- British National Grid
- OSGB36 / Geographic
- OSGB36 / Geocentric
Ellipsoid:
- Airy 1830
Extent:
- UK - Britain and UKCS 49°45'N to 61°N, 9°W to 2°E
Geodetic:
- OSGB36
Map Projection:
- British National Grid
Add a datum transformation
The next step is to create a new Datum Transformation, to transform between WGS84 and OSGB36.
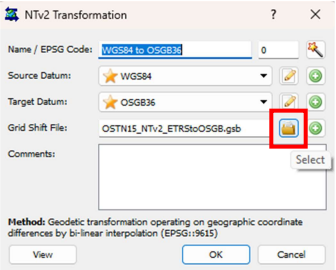
Right-click "Datum Transformations" in the left project tree, and click "New NTv2 Transformation".
Set the "Source Datum" to WGS84, and the "Target Datum" to OSGB36.
Click the folder button to the right of the "Grid Shift File" box and browse for the file "OSTN15_NTv2_ETRStoOSGB.gsb" (see above for instructions on how to obtain this file).
You will be prompted to save the database at this point. Save it into the "GeoSysManager" folder that is in your default RiSCAN PRO project folder (usually C:\Riegl Scans). This will ensure you can find it easily in future. If you plan to use the database on a scanner, use the filename gsm.gsfx. Otherwise, use a meaningful name - for example, BritishNationalGrid.gsfx.
Once you have confirmed the save info, and have been returned to the NTv2 Transformation dialog, click the wand icon at top right to have the name "WGS84 to OSGB36" automatically generated. Then click OK to confirm the changes.
Add a geoid model
Right-click "Geoid Model" in the project tree and choose "New Geoid Model".
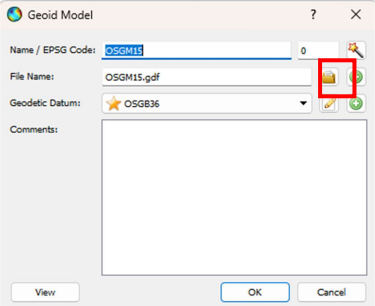
Click the browse icon next to the "File Name" text box, and browse to the file "osgm15.gdf" downloaded earlier.
In the drop-down Geodetic Datum drop-down, select OSGB36. Click OK to confirm the changes.
Navigate to Coordinate Reference Systems in the project tree, and find "British National Grid" in the list. Right-click it and click "Edit".
In the Geoid Model drop-down, choose "osgm15". Click OK to confirm the changes.
Finally, save the database by navigating to Database > Save.
Test the database
You can test the database using the Calculator tool under the Tools menu.
Set the Source CRS to British National Grid, and the Target CRS to WGS84. Enter the British National Grid coordinates of a point within the UK, and click "Calculate forward" to convert the coordinates to WGS84.
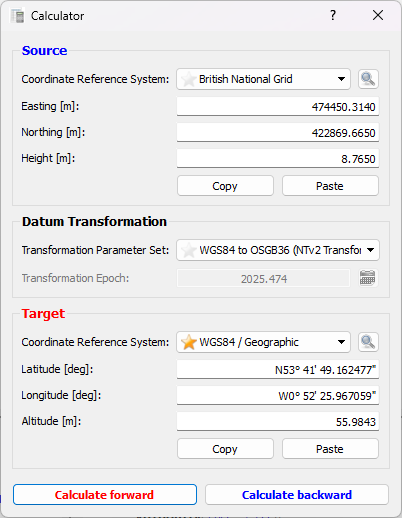
You can also convert the other way by clicking "Calculate backward", or by switching the source and target CRS.
Compare the results obtained against those calculated by Ordnance Survey's Coordinate Transformation tool here.
Using the GeoSysManager in RiSCAN PRO
There are two ways to use the GeoSysManager database in RiSCAN PRO - at the program level (so it is used for all projects), or on a per-project basis.
Program level
Navigate to Tool > Options > General > GeoSysManager. Under GeoSysManager database file, click in the drop-down and click Select...
Browse to the .gsfx file saved earlier (for example, BritishNationalGrid.gsfx).
Now, populate the drop-downs under Import, Scanner GNSS and Export.
For Import, match the Source Coordinate Reference System to that which your control points are in - e.g. British National Grid - and the Datum Transformation to WGS84 to OSGB36.
For Scanner GNSS, set the Source CRS to WGS84 / Geographic and the Datum Transformation to (none).
For Export, set the Target CRS to the one you want to export the data into - e.g. British National Grid - and the Datum Transformation to WGS84 to OSGB36.
The RiSCAN PRO GLCS should normally be left as WGS84 / Geocentric.
Any new projects created in RiSCAN PRO will inherit these settings.
Per project
If you wish to set the GeoSysManager per project, you can do this by right-clicking the project name in the Project Manager, clicking "Attributes", clicking on the "Coordinate Systems tab", and setting the relevant options there.
Uploading the database to a scanner
By uploading the GeoSysManager database (and associated grid shift and geoid model files), they will be included in future scan projects, and imported into the RiSCAN PRo projects ready to use in data processing. To upload the files to a scanner, you will need:
-
ethernet cable
- a computer configured with working network access to the scanner (you may need to set up guest access, enable SMB 1.0, and you will need to ensure the ethernet settings are correct)
- GeoSysManager database file (*.gsfx), geoid file (*.gdf), grid shift file (*.gsb)
Check that you can browse the scanner's internal storage - usually by navigating to \\192.168.0.129\internal.
To prepare the files, copy them into a temporary folder. Rename the .gsfx databse file "gsm.gsfx". Now, copy the three files onto the scanner, into the \internal folder.
The links inside the database to the geoid file and grid shift file need to be relative to the databse file, which may not be the case if they were located in a different folder when you added them to the database. The easiest way to check this is to open the database file that you have just copied to the scanner, using GeoSysManager. Once you have opened it, navigate to "Datum Transformations", double-click on the WGS84 to OSGB36 transformation, and click the "Select" button next to the Grid Shift File filename box. Select the *.gsb file that is located on the scanner.
Do the same for the geoid model, picking the *.gdf file located on the scanner.
Save the database, and reboot the scanner so it picks up the changes.
Once rebooted, tap the GNSS button on the home screen, and you will be able to change the "Coordinate System for display" to one of your own Coordinate Reference Systems.